ArchLinux Tutorial, Part 3: I3 Configuration and Operation
Part 1: Basic ArchLinux Installation
Part 2: X Window System and I3 Installation
Part 3: I3 Configuration and Operation
In the last two posts, we cover base Arch Linux installation on bare bone hardware and X Window Server installation and basic configuration.
In this post, we will cover the i3 Window Manager Configuration and also, we will cover some configuration for the ranger file manager.
What is an i3 ? is a tiling window manager. I3 is one of the fastest and customizable window managers that focuses primarily on efficiency and productivity. I3 provides very different user experience compared to most common Desktop Manager like GNOME, KDE or even XFCE. The learning curve is, but once you get accustomed to a plethora of shortcuts, you will be surprised how efficient and productive Desktop environment can be.
First, let’s configure i3 start when we are starting Xserve
configure ~/.xinit.rc
#!/bin/sh# ~/.xinit.rcuserresources=$HOME/.Xresources
usermodmap=$HOME/.Xmodmap
sysresources=/etc/X11/xinit/.Xresources
sysmodmap=/etc/X11/xinit/.Xmodmap# merge in defaults and keymapsif [ -f $sysresources ]; then
    xrdb -merge $sysresources
fiif [ -f $sysmodmap ]; then
    xmodmap $sysmodmap
fiif [ -f "$userresources" ]; then
    xrdb -merge "$userresources"
fiif [ -f "$usermodmap" ]; then
    xmodmap "$usermodmap"
fiif [ -d /etc/X11/xinit/xinitrc.d ] ; then
 for f in /etc/X11/xinit/xinitrc.d/?*.sh ; do
  [ -x "$f" ] && . "$f"
 done
 unset f
fiexec i3
The first time you start i3, it will ask you a few questions to select management key (primary key to manipulating windows and i3 environment), and you have two selection “Windows Key or Alt Key.” By default, i3 operates with Windows Key, and I recommend to stick with the default option.
Once I3 started will create a configuration file in used ~/.local/i3 directory where you can configure all needed keybindings to get most of the i3 promised efficiencies.
A good start with learning on available options [i3 official website](https://i3wm.org) and specific for ArchLinux users i3 Arch Linux Wiki.
I3 KeyBindings
By default, i3 comes with pre-configured keybindings. I am assuming you selected WinKey and your management key, i3 refers to WinKey as “$mod” key.

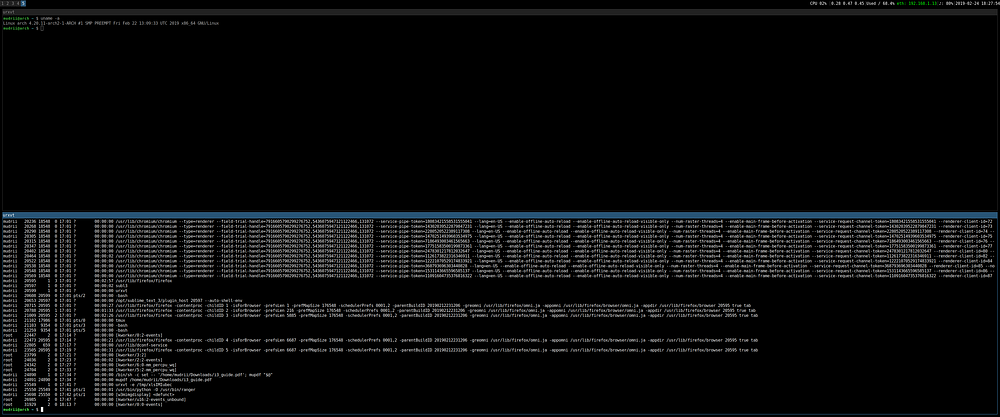
You can try to open multiple terminals and to move between terminal without touching mouse i3 comes with vim key bindings.
You can use Up, Down, Right, Left keys
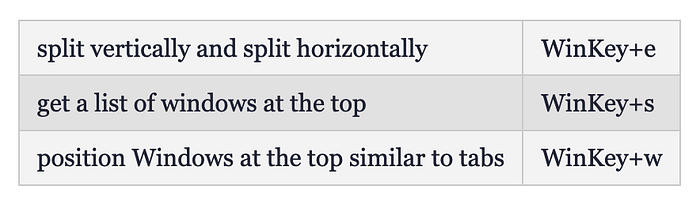
Window Position
Open Application Windows we can arrange in a few ways.
Arranged Vertical
Arranged Horizontally
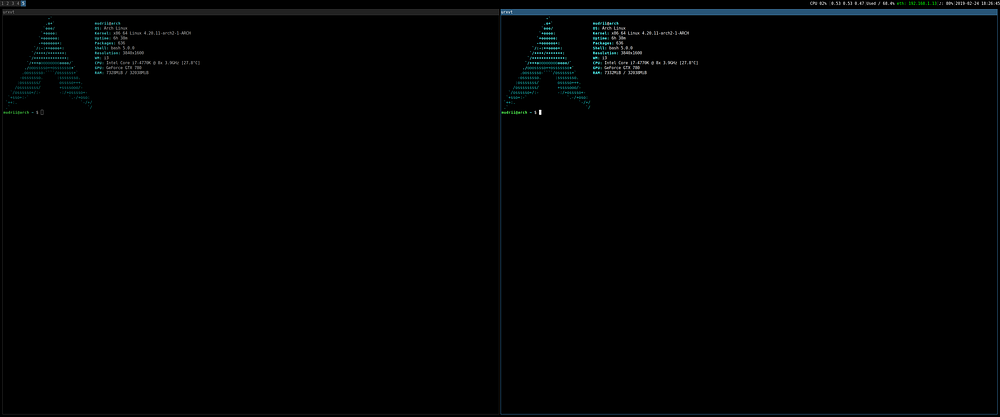
Arranged in Mix mode

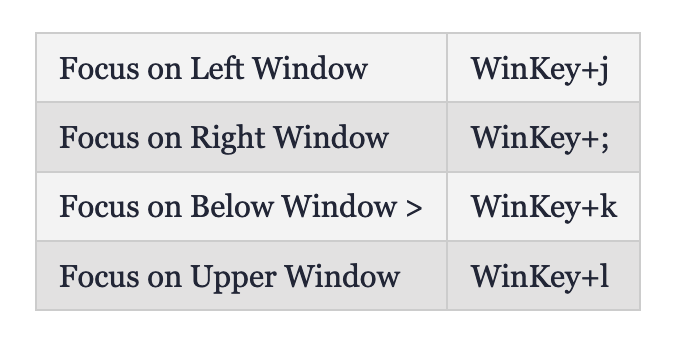
Windows Manipulation
Assuming we may have multiple windows open and you would like to focus on a single window.

I3 is sizing Windows, and every window gets an equal amount of space. But you can still manage your windows in 3 types.
I3 doesn’t provide any the start button where you can lunch application. To start the application you can use dmenu and pick up from the list of install application to launch.

Another way to start an application that may not appear in dmenu

Any time you will open a new application will open in a new window on the right of the active window. If you intend to open a new window below active one, you will need to let your intent know to the i3.

Now you can open the application, and this will open below active window

i3 provides virtual desktops called workspaces, not to clutter single desktop you can open the application in a chosen window using WinKey and number from 1 to 0.
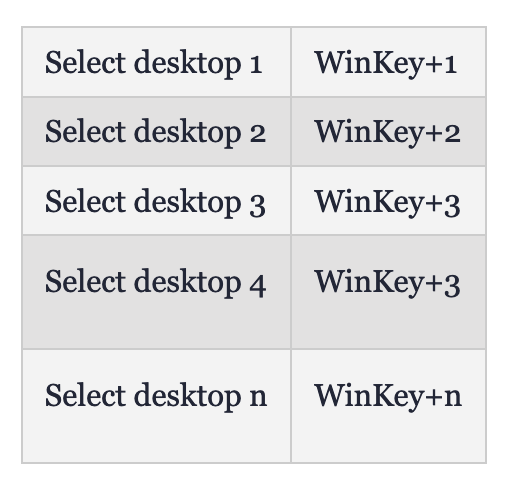
Move open application window to new workspace

In some cases, users may want to make application windows behave similarly as standard desktop windows that can be moved across desktop in different positions and this can be done in i3 by evoking a floating window.

In case you may want to allocate more desktop space for one of the application you can resize it.
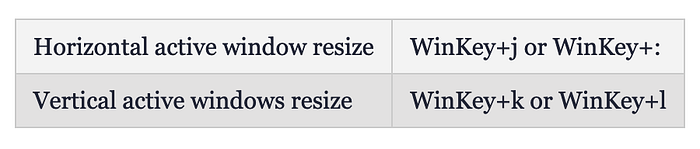
Instead of j,k,l,; you can use keys Right, Left, Up and Down.
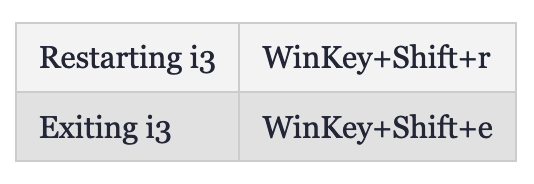
For a more detailed explanation and additional configuration options you can find at i3 user guide
I3 Already comes with tons of useful keybindings that can help us get more focused and get more productive, but we can enhance it even more.
By Default i3 starts with the status bar at the bottom, and on the right side, you can see few system information that can be useful.
Let try to enhance i3status bar and show us only needed information.
We will need to edit ~/.config/i3status/config file.
In below example, I configured my system to show CPU Usage/CPU Load/Disk space used in %/IP Address/Sound Volume/Time
# ~/.config/i3status/configgeneral {
        colors = true
        interval = 3
}order += "cpu_usage"
order += "load"
order += "disk /"
order += "ethernet _first_"
order += "volume master"
order += "tztime local"ethernet  _first_ {
        # if you use %speed, i3status requires root privileges
#        format_up = "E: %ip (%speed)"
        format_up = "eth: %ip"
        format_down = "E: down"
}cpu_usage {
        format = "CPU %usage "
}tztime local {
        format = "%Y-%m-%d %H:%M:%S"
}load {
        format = "%1min %5min %15min"
}disk "/" {
  format = "Used / %percentage_used"
  separator = false
}volume master {
        format = "♪: %volume"
        format_muted = "♪: muted (%volume)"
        device = "default"
        mixer = "Master"
        mixer_idx = 0
}

It is time to do some small modification i3 config file to get some additional functionality.
Edit ~/.config/i3/config and add below changes to your configuration and in some cases, you may need to comment original setting.
# Change Font
font pango:monospace 10# Move status bar on top
bar {
        position top
        status_command i3status
}# Add gaps between windows look nicer
gaps inner 5
gaps outer 5# Mouse, please stop focus whenever you hover to whatever
focus_follows_mouse no# Use Mouse+$mod to drag floating windows to their wanted position
floating_modifier $mod# Enable floating dialogs application window
for_window [window_role="pop-up"] floating enable
for_window [window_role="task_dialog"] floating enable# Key bind for Alsa sound
# Note: My keyboard has dedicated buttons that it is mapped to alsamixer
bindsym XF86AudioRaiseVolume exec amixer -q sset Master 5%+ unmute
bindsym XF86AudioLowerVolume  exec amixer -q sset Master 5%- unmute
bindsym XF86AudioMute exec amixer -q sset Master togglebindsym $mod+= exec amixer -q sset Master 5%+ unmute
bindsym $mod+- exec amixer -q sset Master 5%- unmutebindsym $mod+x [urgent=latest] focus# num lock activated
exec_always --no-startup-id numlockx on
exec_always --no-startup-id conky# Assign application to start on a specific workspace xprop
assign [class="^Firefox$"] 1
assign [class="^Slack$"] 3
assign [class="^Code$"] 2
assign [class="^Vlc$"] 9
assign [class="^Spotify$"] 10
for_window [class="Spotify"] move to workspace 10
for_window [class="^Slack$"] floating enable# Restart or shutdown or suspend by using WinKey+Pause key with meny to select option
set $mode_system System (l) lock, (e) logout, (s) suspend, (h) hibernate, (r) reboot, (Shift+s) shutdown
mode "$mode_system" {
    bindsym l exec --no-startup-id $Locker, mode "default"
    bindsym e exec --no-startup-id i3-msg exit, mode "default"
    bindsym s exec --no-startup-id $Locker && systemctl suspend, mode "default"
    bindsym h exec --no-startup-id $Locker && systemctl hibernate, mode "default"
    bindsym r exec --no-startup-id systemctl reboot, mode "default"
    bindsym Shift+s exec --no-startup-id systemctl poweroff -i, mode "default"# back to normal: Enter or Escape
    bindsym Return mode "default"
    bindsym Escape mode "default"
}bindsym $mod+Pause mode "$mode_system"# Custom Keybindings# Shortcuts to start application
bindsym $mod+Ctrl+f exec --no-startup-id firefox
bindsym $mod+Ctrl+v exec --no-startup-id vlc
bindsym $mod+Ctrl+c exec --no-startup-id chromium
bindsym $mod+Ctrl+r exec --no-startup-id urxvt -e ranger# lock PC
bindsym $mod+Ctrl+Delete exec $Locker, mode "default"# Change you $USER home director and you may need to install packages imagemagick xclip
# take a screenshot of a screen region and copy it to a clipboard
bindsym --release Shift+Print exec "/home/mudrii/.local/bin/screensh -s /home/mudrii/Images/"# take a screenshot of a whole window and copy it to a clipboard
bindsym --release Print exec "/home/mudrii/.local/bin/screensh /home/mudrii/Images/"
Many times I do not want to start my applications one by one and move to correct workspace I want to have a keybinding that allows me to start preselected applications in a predefined workspace and correctly formatted.
To achieve this it will create a script file that can be triggered by a key combination that will open the desired application in the predefined workspace and in a preselected position.
1. Open selected application and position on your proffered workspace and run
i3-save-tree --workspace 1 > ~/.config/i3/workspace_1.json && \
tail -n +2 ~/.config/i3/workspace_1.json | fgrep -v '// splitv' | sed 's|//||g' > ~/.config/i3/workspace_1.json
Above command will create workspace_1.json file with all information captured from i3
You will need to review and edit if required workspace_1.json
2. Create a shell script that will import configuration into i3
Note: In below case, I am starting Firefox, Sublime and Terminal URXVT on Workspace Nr 1
#!/bin/bashi3-msg "workspace 1; append_layout ~/.config/i3/workspace_1.json"# And finally we fill the containers with the programs they had
(firefox&)
# (chromium &)
(subl3 &)
(urxvt &)
3. The last step is to add a keybinding to ~/.config/i3/config
bindsym $mod+Ctrl+1 exec ~/.config/i3/start_w1.shOnce you are in i3 use WinKey+Ctrl+1 to open the predefined application in workspace 1.
Repeat the same process for the rest of the application.
Desktop system information with Conky
Conky is a tool that can display on desktop system information like CPU/RAM/HDD etc.
Conky configuration in ~/.config/conky/conky.conf
-- vim: ts=4 sw=4 noet ai cindent syntax=lua
--[[
Conky, a system monitor, based on torsmo
Any original torsmo code is licensed under the BSD license
All code written since the fork of torsmo is licensed under the GPL
Please see COPYING for details
Copyright (c) 2004, Hannu Saransaari and Lauri Hakkarainen
Copyright (c) 2005-2012 Brenden Matthews, Philip Kovacs, et. al. (see AUTHORS)
All rights reserved.
This program is free software: you can redistribute it and/or modify
it under the terms of the GNU General Public License as published by
the Free Software Foundation, either version 3 of the License, or
(at your option) any later version.
This program is distributed in the hope that it will be useful,
but WITHOUT ANY WARRANTY; without even the implied warranty of
MERCHANTABILITY or FITNESS FOR A PARTICULAR PURPOSE.  See the
GNU General Public License for more details.
You should have received a copy of the GNU General Public License
along with this program.  If not, see <http://www.gnu.org/licenses/>.
]]conky.config = {
    own_window_transparent = true,
    own_window_argb_visual = true,
    own_window_argb_value = 255,
    double_buffer = true,
    alignment = 'bottom_right',
    background = false,
    border_width = 2,
    cpu_avg_samples = 2,
    default_color = 'white',
    default_outline_color = 'white',
    default_shade_color = 'white',
    draw_borders = false,
    draw_graph_borders = true,
    draw_outline = false,
    draw_shades = true,
    use_xft = true,
    font = 'Roboto Mono:size=14',
    gap_x = 20,
    gap_y = 50,
    minimum_height = 5,
    minimum_width = 5,
    net_avg_samples = 2,
    no_buffers = true,
    out_to_console = false,
    out_to_stderr = false,
    extra_newline = false,
    own_window = true,
    own_window_class = 'Conky',
    own_window_type = 'override',
    stippled_borders = 0,
    update_interval = 5.0,
    uppercase = false,
    use_spacer = 'none',
    show_graph_scale = true,
    show_graph_range = true
}conky.text = [[
${color white}Uptime: ${color white}$uptime
$hr
${color white}CPU:$color $cpu%
${color white}RAM:$color $mem / $memmax
$hr
/root: $color${fs_used /} / ${fs_size /}
]]
To see conky for i3 add below line to ~/.config/i3/config
exec_always --no-startup-id conky
Ranger file manager
Ranger is a text-based file manager written in Python. Directories are displayed in one pane with three columns. We can configure ranger to look more like Midnight commander Unix users may be familiar.
Most of the keybindings in ranger are very similar to vim. If you are vim users ranger will fit you like a glove and if you are not this is an excellent opportunity to get acquainted.
Let’s deep dive into the configuration options.
Once installed ranger let’s generate configuration files.
ranger --copy-config=allAbove command will generate 5 files commands_full.py commands.py rc.conf rifle.conf scope.sh
Let’s focus 1st on default keys to manipulate files with the ranger.
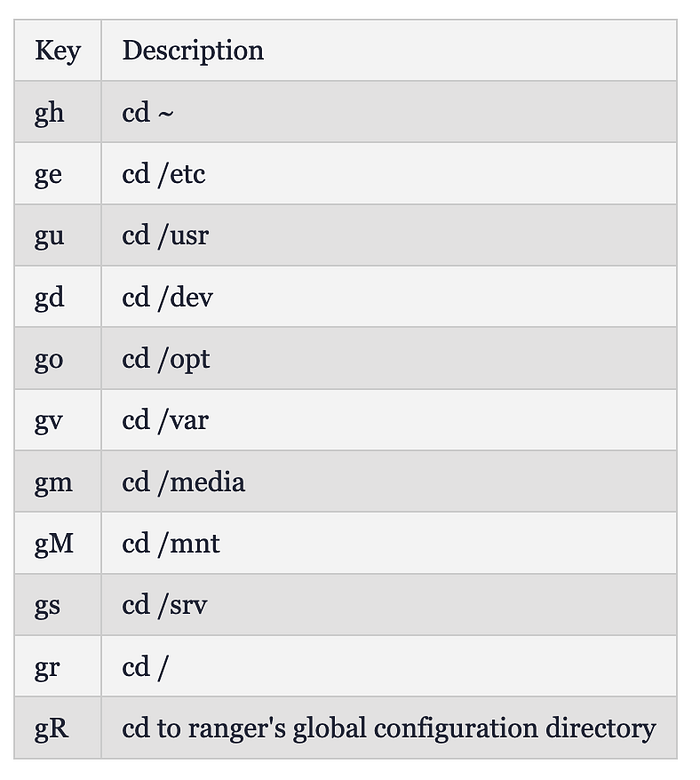
Navigation
Ranger uses many of the same keybindings as vim.

There are also some directory-specific shortcuts to move to common directories:
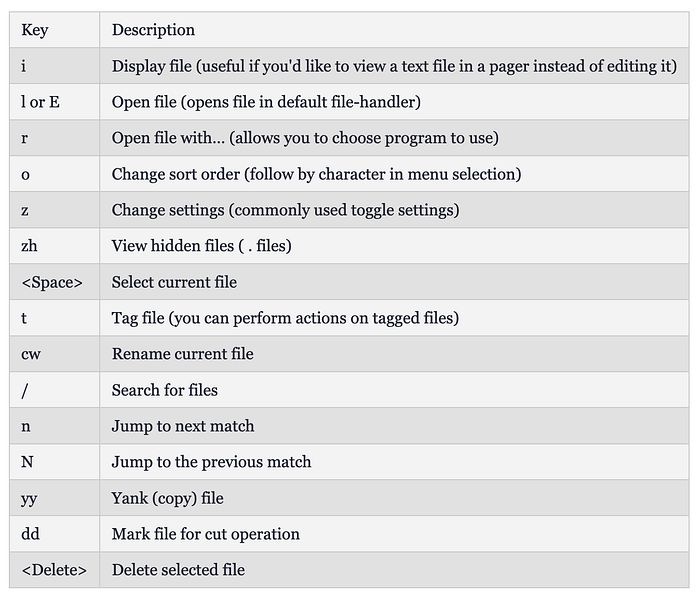
Working with Files
Ranger allows you to perform many different operations on files from within its interface.
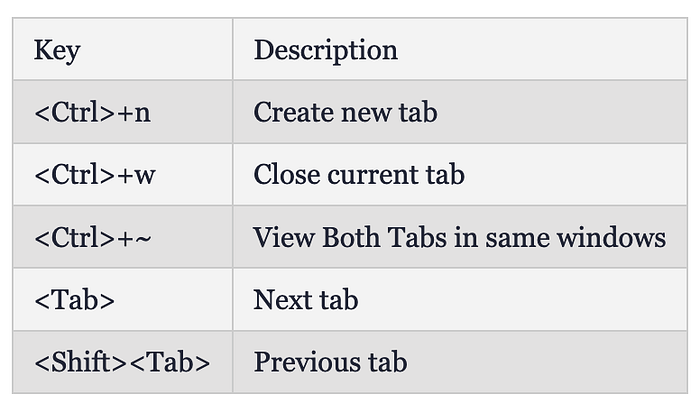
Tabbed Browsing
Ranger also incorporates tabbed functionality to allow multiple viewports into the filesystem.
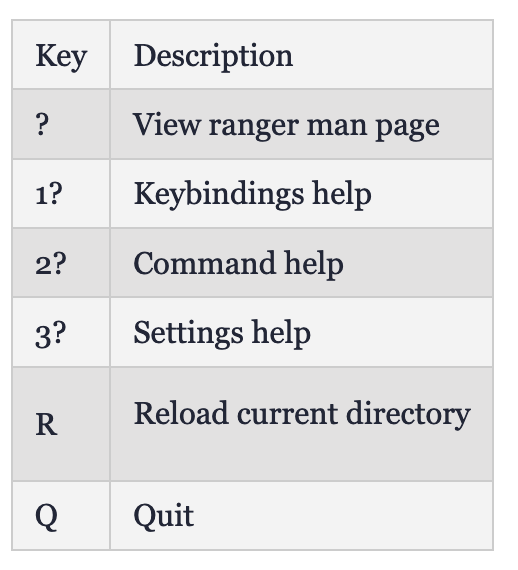
General Commands
These commands control ranger itself:
Command Interface
Like vim, ranger also includes a robust command interface. This allows you to manipulate files in more complex ways.

There are a number of flags that you can pass to commands to modify the operation of the commands. They should be used with a dash “-” after typing “!” for shell commands or “:” for ranger commands:

Ranger also allows you to target specific files by substituting groups of files for command operations. It accomplishes that by using placeholders that will be expanded with the correct files upon execution:
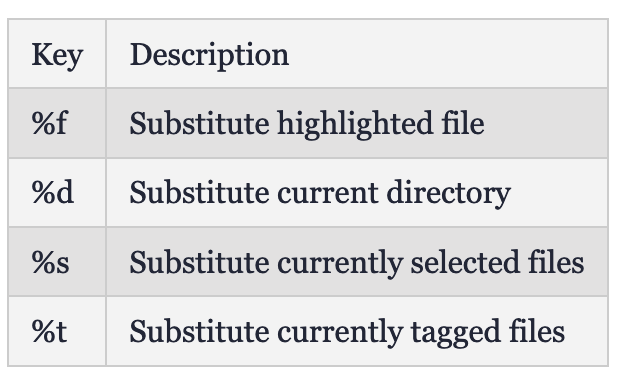
For example, if we wanted to change the names of multiple files, we could select them all with the space bar. After that, we can type:
:bulkrename %sOnce you get familiar with the ranger operational mode you can make some small changes to the ranger and get more costome to our needs by editing main configuration file ~/.config/ranger/rc.conf
Note: In below output, only changes and addon are pasted.
# Show hidden files? You can toggle this by typing 'zh'
set show_hidden true# Be aware of version control systems and display information.
set vcs_aware true# Use one of the supported image preview protocols
set preview_images true# Set the preview image method. Supported methods:
set preview_images_method w3m# Which colorscheme to use?  These colorschemes are available by default:
set colorscheme solarized# Draw borders around columns?
set draw_borders true# Save tabs on exit
set save_tabs_on_exit trueq# Send to trash with single command
map DD shell mv %s /home/${USER}/.local/share/Trash/files/
Let’s add more functionality to cleanup trash by editing ~/.config/ranger/commands.py
class empty(Command):
    """:emptyEmpties the trash directory ~/.Trash
    """def execute(self):
        self.fm.run("rm -rf /home/mudrii/.locale/share/.Trash/{*,.[^.]*}")
You can find more information on Arch Linux Wiki Ranger page.
Above configuration files can be found in my GitHub repo.
We just touched the surface of what is possible in i3.
Every user may have separate setup and desktop configurations and i3 is one of the most flexible and versatile window managers that provides full control over settings.
Feel free to explore and deep dive into countless possibilities i3 provides.